| promotex online - articles | |
| the largest selection of herpa, herpa wings, wooster and promotex models online | |
Setting the StageNovember 15, 2001, by Bill Cawthon If you are like me, you have a fair number of model vehicles. Unless you just keep them packed away in a box, you probably have a display unit, perhaps one of the Herpa wall-mounted cases. These are great for showing off groups of models, but perhaps there is a particular model of which you are especially proud. You can buy a fancy wood base, but a better way to show off a 1:87 scale model is to build a diorama. Dioramas can not only focus viewer attention on your model's best features, they can add interest to your models by placing them in a context that adds viewer appeal. Perhaps you'd like a scene from Pit Row for a model of a racecar, or a truck stop for a big rig. With a little practice and some inexpensive materials, you'll have no problem creating the perfect scene.
A diorama can be as big or small as you would like, but needs to be big enough to display all the scenic elements you wish to show with some space around the primary scene. The best way to plan your display is to think like a Hollywood director planning a scene for a movie. Arrange the major elements, like vehicles and buildings, on a tabletop. Put a piece of paper underneath; it will not only protect the tabletop, it will be used to mark the positions of your "props." Move the pieces around and look at them from several angles, including eye level. If you are displaying your special model in a larger scene, it should be located about one-third of the way from the front to the back while keeping it centered from side-to-side. This allows for more development of the background. Once you are satisfied with the arrangement, mark the locations on the paper. Add a perimeter of at least a couple of inches to the front and sides and probably an inch to the rear. Don't forget to plan for details like people, tools, signs and all the other things that are found in real life. Outdoor scenery touches like trees, shrubbery, gravel shoulders, road striping and such are easy to add. Photographs from magazines and other sources will help you finish your creation to perfection. One of the best things about creating a diorama is that it's both easy and inexpensive. You just use the same materials and techniques the model railroaders use. In fact, the first purchase I would suggest is the biggest; Dave Frary's How To Build Realistic Model Railroad Scenery, 2nd Edition (Kalmbach Books, $18.95). There are a number of books on this topic, but Frary's work has become the standard, replacing Bill McClanahan's 1958 Scenery for Model Railroads. Not only will you learn lots of great techniques, you might get some good ideas from the scenes depicted in the many photos. Other than the book, the costs per diorama are minimal. In the Vampire Villa scene, the two most expensive items are the Vollmer structure and the Busch hearse. Other than that, there's probably less than $3.00 invested. Of course, if you're starting from scratch the initial investment will be somewhat higher. However, when you have finished your first display, you will probably have enough stuff left over to make more. Many of the items you can pick up at the local discount emporium, the rest you will find at any hobby shop catering to model railroaders. Best of all, the techniques Frary presents will quite likely have you enjoying your new An easy-to-build first diorama might consist of a small base with some basic ground cover (dirt, grass, etc.) and a gravel road upon which to pose your model. Bill of materials: 8" X 8" Base; flat latex paint; Woodland Scenics or similar ground foam; white glue (like Elmer's); a couple of plant misting bottles with adjustable nozzles; liquid detergent (like regular Ivory - you don't need lotion, lemon scent, anti-bacterial or other additives. Cheap store brands work great). Woodland Scenics Fine Ballast makes a great gravel road; select the color you like best. The base can be scrap wood, extruded Styrofoam insulation or white bead-board Styrofoam. Since most modern scenery techniques require lots of water, I do not recommend using paper-based products like mat board or foam core. Styrofoam is light, waterproof and easy to work with. Model railroaders generally prefer the blue (or pink) extruded Dow Styrofoam insulation. It is very strong, easy to cut cleanly and comes in 4' X 8' sheets either 1" or 2" thick. One of the drawbacks to this material is seeking out a retail source, but big stores such as Lowe's often carry it. The white bead-board Styrofoam is more widely available and works almost as well. You may be able to find suitable scraps at the hardware store or home construction sites. Visit your favorite hardware supplier and buy a gallon of cheap flat-finish latex paint. Select a good earth color that would be appropriate for the terrain you wish to represent and have them mix it up. If you can get a smaller container, do so, since a gallon will go a very long way. While you are in the hardware section, get a big bottle of Elmer's or other white glue. Then drop by the garden department and pick up a couple of misting plant sprayer bottles. Do not try to economize by getting the cheapies; they do not last and clog too easily. Spend the couple of bucks for the good ones. Last stop on the shopping trip is a good hobby shop. After you get through seeing if any new models have arrived, head over to the scenery section. Pick up bags of different colors of ground foam like Woodlands Scenics or AMSI. A brown earth color, the yellowish burnt grass and a couple of greens should do it. Using more than one color for your grass will make the effect more natural and less like a golf course. Don't forget your ballast! Before painting the base, there are a few preparations. First, of course, is a drop cloth. Second is to fill your misting bottles. Fill one sprayer bottle with water and add several drops of dishwashing liquid (about 4-5 drops per pint) to make the water flow more easily and to reduce surface tension which can cause your scenery materials to bead up. Fill the other bottle with a 3:1 mixture of water and white glue (3 parts water, 1 water, plus the same number of drops of detergent). Now paint the base with a good, thick coat of latex paint. Next, while the paint is still wet, add the first layer of ground cover, the Woodland Scenics brown "Earth." Once you have added the foam, set the water spray bottle to a fine mist and spray everything until it is thoroughly wet. You can add more foam, but keep everything wet. Once dry, the latex paint will act as glue and you will have a uniformly colored terrain base. Before moving on to the next step, mark the boundaries of your road with pins (easy if you're using a Styrofoam base). When the terrain base is dry, it is time to add the Woodland Scenics "grass" foam. You can sprinkle it on with your fingers, but I prefer to use a shaker jar. I like the large clear plastic ones used for Parmesan cheese. They only need to be rinsed out to be just as good as the ones sold by Woodland Scenics. Mix the shades of green together with some of the yellowish "burnt grass" to achieve a more realistic color. Before you sprinkle, spray your terrain base with the water and glue mixture. As before, set the nozzle to a fine mist and spray the terrain base with this mixture, making sure everything is soaked. Then sprinkle your turf mix right on and mist it again. Build the ground up to the edge of the road, making sure to keep misting the fresh ground foam. The turf will combine with the glue mixture and dry to a nice hard finish. In nature, the grass and foliage come before the road. A gravel road is one of the few times the same is true in modeling. Once the grass layer has dried (overnight is long enough), carefully sprinkle the ballast to form your road. A small, soft-bristled brush will help move and smooth the ballast. Once ballast is down to your satisfaction, mist it thoroughly with water. Then follow up with the water-glue mixture. Be sure to spray enough that you see water at the top. Let this dry overnight. Then you can touch up any boundaries between the grass and gravel. Don't be too finicky; gravel normally winds up along the side of the road as it's thrown there by passing cars and trucks. After everything is dry, you are done. Add details like a tree or shrubs. If you want to dress up your diorama, paint the edges black. Better yet, add a frame of Masonite or other thin material. This will also protect the edges from the dings and arrows of outrageous fortune. I have only touched on the basics, but I hope you are inspired to try your hand at diorama building. Whether you are a collector or modelbuilder, you will find it adds even more enjoyment to a great hobby. - Bill Cawthon Bill Cawthon is an award-winning modeller and collector. His primary modeling interests are model railroading and vehicle models in 1:87 and 1:160 scales. He has written numerous articles for regional and division NMRA publications and is a contributor to the newsletter of the 1-87 Vehicle Club. He follows both the automobile industry and the European scale vehicle industry. In real life, Bill is a full-time marketing and public relations consultant for the high-tech industry. He lives in Houston, Texas with his wife and four children. Bill writes bi-weekly for Promotex Online. To learn more about him, click here.
|
home | checkout | pricelists | search | contact
| published by Cadabra Corp. | This page was lasted updated: October 12, 2005 |
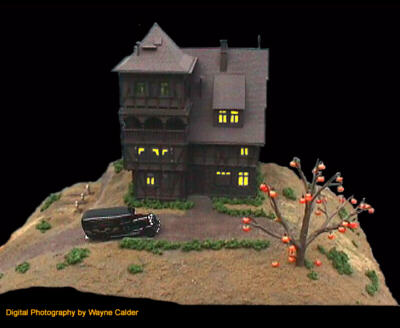 As a model railroader, I have been building dioramas for a number of years. The illustrations for this column are a couple of special ones I created for holiday decorations. The haunted house with its pumpkin tree was inspired by Ray Bradbury's "Halloween Tree." The Christmas tree lot was built about a dozen years ago. It still makes its appearance after every Thanksgiving.
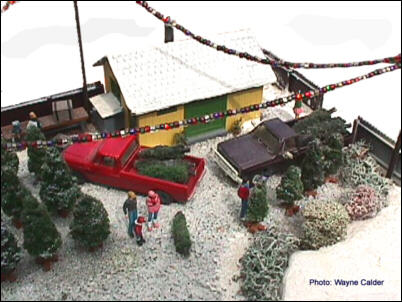 display in much less time than it took
to build your prized model.
display in much less time than it took
to build your prized model.