| promotex online - articles | |
| the largest selection of herpa, herpa wings, wooster and promotex models online | |
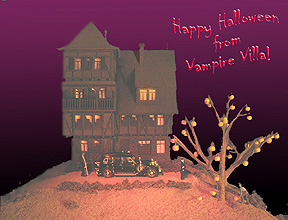
Photo FunNovember 1, 2005, by Bill Cawthon It will be November when you read this, but it's still Halloween as I am writing. I hope your Halloween involved more treats than tricks. Even an early evening rain wasn't enough to keep our son and grandson from making their rounds. Once the rain stopped, we had so many visitors we almost ran out of candy. Several years ago, I built Vollmer kit 3679, Vampire Villa as a holiday decoration. I mounted it on a base carved from a block of Styrofoam and added some details like graves with headstones and an arm coming up out of the dirt. Inspired by Ray Bradbury's "The Halloween Tree," I used a Woodland Scenics tree armature and some orange beads to create a pumpkin tree (yes, I know pumpkins don't grow on trees). I painted a few undecorated Preiser figures and added the Grim Reaper figure from Busch to give some "afterlife" to the scene. Each year, I park a vehicle or two in the driveway. Usually, it's one or two of the Busch hearses but this year, I used Ricko's new 38809 1935 Horch 851 Pullman to give the Count a classy ride to the festivities.
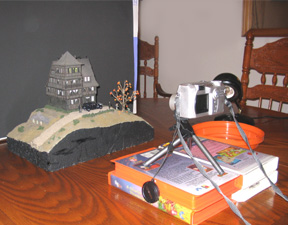
Then it was time for photography. Before I tell you how I created the image I first want to give you a bit of background. When I began writing these columns almost five years ago, I would send the text up to Bill Brillinger, Promotex's webmaster, and tell him what photos I wanted to use. This limited me to pictures of Herpa models, but that was okay in the beginning. As time went by, I began to acquire more and better tools to create images for these columns. Probably the most important was the full-strength version of Adobe Photoshop. With Photoshop, I could compose pictures exactly the way I wanted them. The only drawback was that I was still limited, this time to images available in digital format or on the Internet. Once again, this was fine for most purposes, but still not a perfect solution. Last Christmas, I finally freed myself from the last of the limits by purchasing a digital camera. Now I can take pictures exactly the way I want them. I can pose models the way I want and shoot them from the angle I want, whether it's an overhead shot or straight on. Some people ask about what kind of camera is best for photographing scale models. Usually the question involves megapixels, but that isn't always as important as looking for some other features, especially if you don't have an unlimited budget.
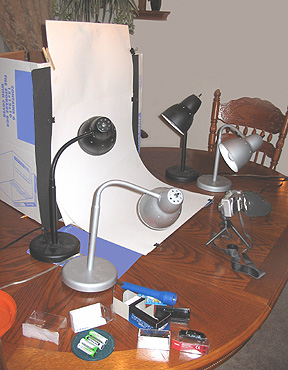
I use a Canon PowerShot A85, a four megapixel camera that was already on its way out when I bought it. This meant I was able to pick it up for less than $300.00. While four megapixels has proven more than adequate when set on maximum resolution, the Canon also offers a macro setting and the ability to select manual mode. This means I can shoot very close to the model and set the aperture and exposure that are right for the picture I want to take. In model photography, aperture control is important to get the maximum depth of field, that is, the maximum area from front to back in which the image will be in focus. The Canon offers a maximum aperture of f8, which may not sound like much compared to the f22 setting available on many 35mm SLR film camera and high-end digitals, but it's enough for my purposes. Exposure is also important because I don't use the flash. I found the flash adds two unpleasant effects to digital photos of small scale models: discoloration and too much light. While the Canon's flash isn't as bad as some cameras I have tried, it still adds a yellow cast to everything and even with multiple flash settings, I get hot spots on the image. The bad thing about not using the flash is that exposures have to be longer. In fact, in most cases the exposure is too long for you to hold the camera without shaking it. So one of the first accessories I bought was a small tabletop tripod. Using the tripod and the camera's built-in timer, I can set up the shot, press the shutter release button and get my hands off the camera before the shutter is released. Using the tips I learned in a photography course years ago, I take several shots of the same scene using different exposure times. Even though I have taken thousands of photographs, I still take multiple shots because I have found that the image on the camera's LCD screen is highly optimistic compared to what you see when the image downloaded or printed. The other trick to taking a good photograph of a model is plenty of light where you want it. Multiple light sources will give the best results because you eliminate shadows. This is what professional photographers call "fill" lighting. Even a photo taken in sunlight can benefit from some fill lighting, even if it is just sunlight bounced off a sheet of bright white paper or a mirror.
One of the nice extras on my Canon is an adjustment for taking pictures with tungsten lighting. That's the kind of bulb found in most common household lamps. I like this feature because I can set up my lighting using cheap gooseneck lamps that you can pick up at a discount store for less than ten dollars apiece. I use standard sixty watt bulbs. It sure beats paying big bucks for the lighting setups used by folks who do this for a living. My stage is equally fancy. For a seamless backdrop, I use a couple of pieces of poster board clipped to a cardboard box. A bed sheet will also work, but poster board generally won't have wrinkles. In addition to being cheap, this can be set up and taken down within a few minutes; very handy when you're doing your photography on the dining room table. I use five lamps for model photography. Two are aimed behind the model to bounce light off the poster board and avoid a too-dark background. Two are aimed at the model to give even lighting from both sides. My fifth lamp is a small Tensor light which I set next to the camera and aim to fill in the front of the model. Using this setup, I have been able to get good photographs of everything from a couple of 1:160 Herpa Minis to a 1:53 tractor-trailer rig that was over two feet long. But it wasn't going to work for the shot I wanted of Vampire Villa. The problem is that Vampire Villa is designed for internal illumination. It originally came with a red incandescent bulb, but I was not impressed with the result so I replaced the red bulb with a number of LEDs to get better lighting through more of the windows. Unfortunately, using my standard lighting arrangement would wash out the internal lighting giving me some very un-scary white windows. After a bit of experimentation, I settled on a very long exposure and some creative lighting. I dimmed the overhead lights and used the Tensor lamp with an orange filter improvised from the top of a Halloween candy bucket. During the exposure, I briefly waved a red flashlight over the front of the diorama to give it some extra lighting. It took about thirty exposures before I was happy, but it was worth it. I got a nice Halloween glow that sets the scene very nicely. If you've always wanted to take pictures of your models, or if you want your pictures to turn out better, you might try some of the ideas I have outlined here. Digital cameras make it easy to take a picture, download it to your computer, decide what you want to change and go back for another. Incidentally, unless you are going to do advanced photo editing, you don't need the full version of Photoshop. Most of what you will want to do will involve adjusting the brightness, contrast and color, features available in all sorts of inexpensive software. You can also crop pictures, a real help in shooting 1:87 scale cars and trucks. See you next time! - Bill Cawthon Bill Cawthon is a modeler and collector. His primary hobby interests are vehicle models in 1:87 and 1:160 scales and model railroading. He is senior editor of Route 1-87, the magazine of the 1/87 Vehicle Club, and a columnist and product reviewer for Model Railroad News. He is one of the creators of the award-winning "Grimy Gulch" model railroad layout. In real life, Bill is a marketing and public relations consultant for MARK III Systems, a successful information technology company. He also writes for just-auto.com, an international auto industry publication, reporting on the U.S. light vehicle industry. He lives in Houston, Texas with his wife, Marge, and their children. Bill's columns appear twice monthly on Promotex Online. To learn more about him, click here.
|
home | checkout | pricelists | search | contact
| published by Cadabra Corp. | This page was lasted updated: November 01, 2005 |