| promotex online - articles | |
| the largest selection of herpa, herpa wings, wooster and promotex models online | |
Killing the showroom shineAugust 15, 2002, by Bill Cawthon Collectors tend to keep their models pristine, just as they left the factory. Those who like to build scale models like them bright and gleaming when they are displayed. However, there are others who use their model vehicles in a different way: as elements of a scene. This group includes diorama builders and model railroaders. If you are like most model railroaders, you take that nice new vehicle model right out of the box and plop it right down on the layout. After all, that's what "ready-to-run" means, right? If that is what you want to do, go right ahead. You're in good company. But if you've spent hours weathering your rolling stock and structures, and blending your scenery hues, I would think the last thing you want is a big hunk of shiny plastic in the middle of everything, yelling, "TOY!"
If that got your attention, I'd like to share a few tips that might help you give your vehicles the same realism as the rest of your model world. The first thing to do is disassemble your model. This isn't as hard as it might seem. To save time and reduce costs, most modern 1/87th scale vehicle models are designed to be assembled without glue. Carefully examine your model to see how it is put together, remembering that model manufacturers often use pieces like headlight, taillight or grille inserts as locking pins. On other models, you may see a tab masquerading as a rear license plate. In any event, the vast majority of models will come apart easily. The next step depends on how serious you are about making your model as realistic as possible. If you want to make your scale vehicles look like they live in the real world, you are going to get rid of the chrome plating. There are two reasons for this: First, a 1/87th scale model is not big enough to carry off a shiny chrome finish. Large areas of chrome look great on a prototype car in the showroom because there is enough acreage to spread out the highlights. On a HO scale model, it turns into one big hot spot. Second, in the outside world, chrome loses its shine very quickly, as dust and road grime coat it and dull it to a matte finish. Chrome plating is easily removed by soaking the part in an ammonia-based liquid cleaner for about an hour. Watch the time carefully and rinse the parts immediately after removing them from the cleaner. When the part is dry, paint it with a matte metallic finish like Stainless Steel or Flat Aluminum. Whichever color you select, use the same one for all the chrome trim surfaces on the model. How about the bright silver or chrome paints? They're fine for headlights and mirrors. For headlights, I like to use silver topped off by several coats of clear gloss finish to give the illusion of a bit of depth. It also contrasts very nicely with the flat metallic finish used on the rest of the grille, making your headlights stand out, just as they do on a real vehicle. Even for those models that come with clear plastic headlight inserts, I give the insert backs a coat of silver. I also use silver as a base coat on taillights and turn signals. I then add a coat of transparent red or amber, as appropriate. The effect is far more realistic than a coat of standard red, especially on a red car or truck. If your car or truck has an interior, paint it with flat colors or just give it a couple of light coats of a matte finish, like Testor's Dull Cote. If your vehicle is going to be on the road, add a figure or two. File down the seat back and cushion a bit and sand the back and underside of the figure so it looks like it is sitting in the seat. Normally, a person's head and the top of their shoulders are the most you should see looking in from the side. You can always trim the figure's legs to make the fitting easier. If you plan to paint the body, use gloss paints. They will give a better finish on a small surface. A gloss finish also takes decaling better. Even if you are happy with the color, give the body shell a couple of light coats of either a gloss finish or matte finish. A gloss finish will look more like "showroom new" or "just waxed" than plain plastic. A matte finish will look more like a regular car or truck and blend better with the rest of the scenery. That's because dirt, grime and dust quickly coat everything and dull the brilliance of paint and chrome almost into a common value. One extra benefit of the finish coats is that they kill the static charge found on most plastics. This static charge tends to attract dust; so coated models will stay cleaner, longer. One more thing, if your model did not come with rubber tires, as is true of a number of Wiking models, do not paint the tires flat black. Tires are not flat black and it is too strong a color for a small-scale model. If you look at real tires, you will discover they are really a dark brownish-gray: a shade an artist would call a warm gray. I use a mixture of acrylic flat black, gray and a touch of dark brown. Other than drying time and fitting a figure into the driver's seat, you will have probably spent about an hour detailing and finishing your model. You can assemble it and add it to your scene. You will be amazed at how much better and more natural it looks.
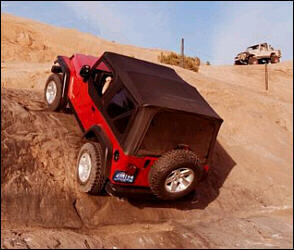
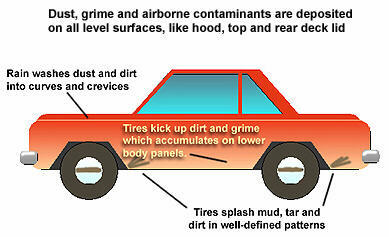
For a long time, this was as far as I went with my models. To be honest, most model railroaders are happy with the "plop" method in the second paragraph and I received many compliments on my cars and trucks. Then my Dad had a chance to look at some photographs of some scenes I had created. Dad not only had a long career in the auto industry, he is an excellent painter with an artist's eye for detail. He said, "Bill, cars are never that clean." That sent me back to square one in a hurry. I started really looking at cars and trucks on the road and realized he was right. Most vehicles are dirty. Not like the average Union Pacific locomotive, but definitely not showroom fresh. Tires kick up mud and grime in fairly well defined patterns along the lower front fender and rear quarter panel. A coating of grime also builds up on the lower body and rocker panels, where they curve in toward the frame. Airborne dust, pollen and contaminants are deposited on every level surface and rain washes these down into curves and crevices. Station wagons, vans and SUVs will have a buildup of dust and grime on the tailgate and rear window, caused by the partial vacuum created as the vehicle moves through the air. Vehicles that have spent their lives in the Snow Belt will often have patches of rust along their lower bodies and weld seams caused by years of exposure to road salt. Older vehicles in the South and Southwest will often have bleached areas on the hood and roof. Off-road vehicles or those used in construction will often have dirt in places that defy explanation. The same techniques used for locomotives and rolling stock will work on vehicle models. Use thinned paints in an airbrush or finely ground pastels, building up the color until you are satisfied and fixing it with light coats of matte finish. The major difference is that the weathering colors should be light and similar in hue to the ground color you selected for your scenery base. Most cars do not have heavy streaks of rust or diesel exhaust. On truck wheels, I use a thin wash of a tan or very light brown. It not only adds weathering, it brings out detail and gives the illusion of more depth. The same wash can be used to simulate buildup of dirt and grime on running boards. And don't forget streaks of diesel fuel on the tanks. One neat trick that works well, especially on older pickups, is to paint a fender, door or hood a different color than the rest of the body. Such "junkyard" replacements are common and easier to create than dents and dings. While full-tilt weathering methods may be a bit much for a layout with dozens of vehicles, the basics described earlier will work for the majority. Save the "extra mile" effort for the vehicles that figure prominently in your favorite scenes. See you next time! - Bill Cawthon Bill Cawthon is an award-winning modeller and collector. His primary modeling interests are model railroading and vehicle models in 1:87 and 1:160 scales. He has written numerous articles for regional and division NMRA publications and is a contributor to the newsletter of the 1-87 Vehicle Club. He follows both the automobile industry and the European scale vehicle industry. In real life, Bill is a full-time marketing and public relations consultant for the high-tech industry. He lives in Houston, Texas with his wife and four children. Bill writes bi-weekly for Promotex Online. To learn more about him, click here.
|
home | checkout | pricelists | search | contact
| published by Cadabra Corp. | This page was lasted updated: October 12, 2005 |