| promotex online - articles | |
| the largest selection of herpa, herpa wings, wooster and promotex models online | |
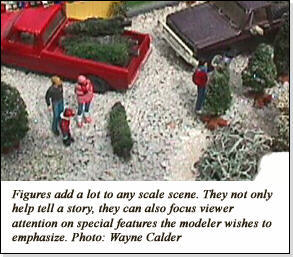
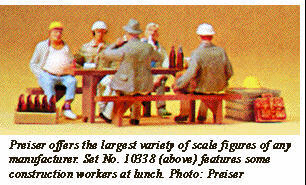
Cheap PeopleFebruary 1, 2002, by Bill Cawthon I am a firm believer in adding scale people to dioramas. They add interest and can help focus the viewer’s attention on areas you think are important. They also help tell the story of the scene you have created. Aside from all such swell "artistic" reasons, they also provide opportunities to have some fun with your scenes. Of all the sources for quality scale figures, Preiser is quite likely the best. In the more than fifty years since Paul Preiser displayed his first creations at the Nürnberg Toy Fair, the company has enlisted very talented artists to create their masters. Even in the smaller scales, Preiser characters are well detailed and carefully produced. For a small scene, the pre-painted figure sets are perfect. Preiser offers a wide variety of poses and costumes suitable for almost any period in modern history. On the other hand, if you have a large scene or a model railroad, those sets can call for a formidable amount of money. Right now, the average Preiser figure runs about $2.00. There are economy sets, but even then, it’s still somewhere close to a dollar a figure. Fortunately, there is a solution allowing you to save a lot of money and still have good-looking people: Buy the unpainted bulk sets of Preiser figures and paint them yourself. With this method, you can populate your pike for as little as a quarter per figure. Painting scale figures is not difficult. For one thing, the bulk sets come with the figures still attached to the sprue, which simplifies handling. For another, the simple method I use to paint figures means mistakes can usually be easily fixed. I start by mixing a flesh tone with acrylic paints. I’ve used most of the popular brands of acrylic hobby paints and have been happy with all of them. However, I have found that the pre-mixed “Caucasian” colors tend to be a little too pale for my liking, especially since most of my modeling involves the desert southwest. I generally darken the store colors with a drop or so of a medium brown. If you decide to make your own color, make sure it will look right in the lighting on your layout and not be too dark for a small-scale figure. Keep track of the colors you mix to make sure you can reproduce the shade you like. Next, I airbrush an entire sprue of figures, making sure I cover them completely. Before painting the each succeeding sprue, I darken the paint color a bit more. This gives me some of the variation found in real life. I also paint some figures various shades of brown. This is not to be politically correct; it is just modeling reality. Once again, be sure to keep a record of the colors and quantities you used. This will come in handy if you need a touchup down the line. After the sprues have had a chance to set up for about a day, I give each one a couple of coats of matte finish. I use Testors’ Dull Cote, a flat lacquer, but there are Incidentally, another author recommends painting the sprues flat black. I am sure that practice is fine, but prefer my method for two reasons. First, it avoids extra coats of paint, which can hide the detail you just paid big bucks to obtain. Flat black is a strong color and is not easily hidden. Second, I have found over the course of painting hundreds of figures that the flesh tone and Dull Cote, even with the deeper browns, will snap out the detail, making painting clothing a lot easier. Before starting on the next step, I would highly recommend investing in a few red sable or “kolinsky” round brushes in different sizes. I generally use a #2, a #0 and a #000 spotter, but I have used sizes up to #4 with good results. Don’t settle for imitations; get the real thing. I prefer the Windsor & Newton #7, but Grumbacher makes a good product and is sold in more places. A real red sable round will hold a point better than any other type of brush and, with thinned paints
and a little practice, you can produce a line as fine as a technical pen. This makes painting neckties, belts and similar items a snap. A quality red sable brush is going to set you back between five and ten dollars even for a small spotter, Once you have your brushes and the sprues are completely dry, you are ready to start painting the large areas of clothing. I have found the easiest method is to paint the layers of clothing in the same order in which you would put them on. Shirt before the pants, pants before the coat, etc. This way it’s easy to cover overruns from an earlier color. I only use acrylic paints in this step because if you make a mistake and paint an ear blue, it’s a simple matter to very gently wash off the paint before it begins to dry. The matte coating will protect the underlying flesh tone and you’re ready to try again. If there are details like neckties, belts, items that are held in the hand, etc., this is the time to get out the magnifier and small brush. By leaving the figures on the sprue, this delicate process is made much easier. When selecting colors for clothing, real life is your best “prototype” source. Look around at work or the next time you visit the grocery store. As you observe real people, you’ll find there isn’t as much variation as you might expect. Men wear blue jeans and khakis, dark suits and a relatively narrow range of shirt colors. White and a selection of blues, grays, browns and tans will go a long way. Use other colors occasionally to add variety. I never use straight black, except for shoes, belts and the like. It is too strong a color for a small-scale figure. I have found a dark charcoal gray to be more realistic, even for cloth that is supposedly black. Women will wear a wider variety of colors, but even here, let observation be your guide. After the clothing is painted and the paint has had a chance to set up, it’s time for a couple of light coats of matte finish. Once again, let the matte finish cure before moving on to the next step because you will be handling the individual figures. Now it’s time to remove the figures from the sprue. Never, ever, not even once, try to remove a figure from the sprue by twisting. You will almost invariably leave behind the head, arm or foot by which the figure was attached. Instead, use a sharp hobby knife, scissors or (best) flush-cutting nippers to carefully cut the figure from the sprue. After cutting the figure from the sprue, use the hobby knife and fine sandpaper to remove the excess plastic and shape the rest to the proper contour. Generally, Preiser attaches figures to the sprue by their heads, so all that should remain is to paint the hair, hat or helmet. Once the figure is completely dry, I use a small dab of rubber cement to attach it to a temporary base. I make mine from two craft sticks (we used to call them Popsicle sticks) glued together in the form of an “X”. One of these bases will hold about six figures (the crosspiece is to allow the base to be free-standing). I then give the finished figures a couple of final light coats of matte finish. This not only seals the paint, it protects the figure from future handling. Once the
matte finish is cured, it’s easy to remove the figures from the sprue, gently removing the rubber cement by rolling it off with a fingertip. Your figure is now ready to take its place on your layout or diorama. The actual process of painting figures takes very little time. Other than drying time, a sprue of normal figures will require perhaps an evening of ignoring prime-time television. Of course, uniformed figures, like soldiers, police or railroad personnel, will take more time because of the amount of detail painting involved. And I should warn you, it’s easy to get carried away with detailing. However, that’s okay. With practice, you’ll wind up with figures that are actually superior to those found in the pre-painted sets. They will also be finished exactly the way you want them, in the colors you think right. I was asked not long ago how to simulate shadows to add relief to faces and clothing. To be honest, my technique is focused on quickly producing large quantities of figures that are comparable to the pre-painted sets. However, for special figures, like those that might be in the foreground of a scene, close to an observer, the technique I prefer uses a very thin wash of brown or dark gray paint. I drybrush it over the entire body with a light, upward stroke. For the head, I use a drybrushed brown and take a bit more care, building up the shadows under the chin and eyebrows, the strong shadow areas of the face. With a very delicate touch and a very steady hand, you can add the shadow under the nose, but remember the nose casts a very small shadow and it's easy to overdo, giving your figure an unintended moustache or the appearance of a corporate “yes-man.” I don’t bother with the eyes, simply because from the distance a typical figure on a model railroad layout is viewed, the iris and sclera would be invisible. The human eye is very difficult to capture realistically, even on a large-scale figure. Note: I originally wrote an article with this title in 1993 for the National Model Railroad Association’s Texas Gulf Coast Division newsletter, The Waybill. It was later reprinted in the NMRA’s national publication, the Bulletin. The material in this column has been revised based on the experience I have gained in the intervening years. See you next time! - Bill Cawthon Bill Cawthon is an award-winning modeller and collector. His primary modeling interests are model railroading and vehicle models in 1:87 and 1:160 scales. He has written numerous articles for regional and division NMRA publications and is a contributor to the newsletter of the 1-87 Vehicle Club. He follows both the automobile industry and the European scale vehicle industry. In real life, Bill is a full-time marketing and public relations consultant for the high-tech industry. He lives in Houston, Texas with his wife and four children. Bill writes bi-weekly for Promotex Online. To learn more about him, click here.
|
home | checkout | pricelists | search | contact
| published by Cadabra Corp. | This page was lasted updated: October 12, 2005 |
 many good acrylic products, too. I let the matte coating cure for several days, until there is none of the lacquer odor left. This step is important as it provides your “safety net” should you make a mistake later on.
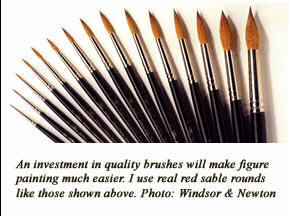 but with proper care, they will last a long time. If you want to economize, you can substitute a synthetic sable for the larger brush sizes, but for fine details,
genuine kolinsky is king.
but with proper care, they will last a long time. If you want to economize, you can substitute a synthetic sable for the larger brush sizes, but for fine details,
genuine kolinsky is king.